Sign in to ClarkYOU
 Launch your web browser and browse to ClarkYOU (http://you.volamdolong.com/).
- Enter your Clark Account username and password. Click Login.
If you need assistance obtaining your Clark username and/or password, please contact the Clark ITS Help Desk at helpdesk@volamdolong.com or 508-793-7745.
If you have not already activated your Clark Account, please go to tokk83.volamdolong.com/activate and follow the online instructions.
Access CUWeb Registration (old version)
For instruction using the new version of CUWeb, click on the Students tab above.
-
- Once logged in, select “Main Menu” under the CU Web quicklinks found along the left side of any ClarkYOU page
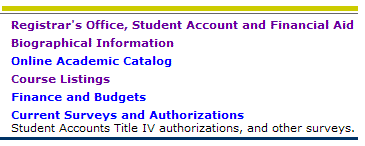
- Select Registrar’s Office, Student Account and Financial Aid
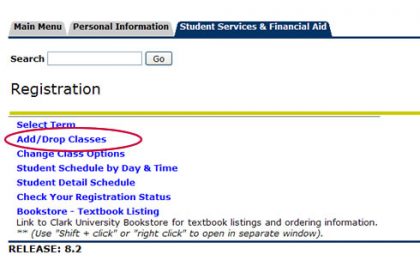
- Select Add/Drop Classes
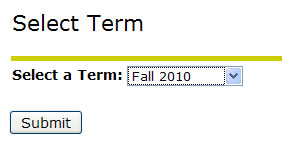
- Select the term you are registering for and hit Submit
- Once logged in, select “Main Menu” under the CU Web quicklinks found along the left side of any ClarkYOU page
Add/Drop Classes
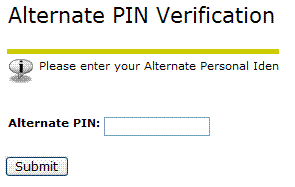 If you are prompted to enter a PIN number, please contact your adviser. They will email that information to you. PIN numbers are assigned to all matriculating students during the fall and spring semesters.
When registering for the first time, a blank registration form will appear. After that, when adding/dropping classes, you will see your Current Schedule on top and the Add Classes area below. To view Course Offerings, click that link at the BOTTOM of the page.
- In the Add Classes table, enter the CRN number for each course (and lab or discussion section if required). Use a separate box for each CRN. Click Submit Changes after you have made all your entries.

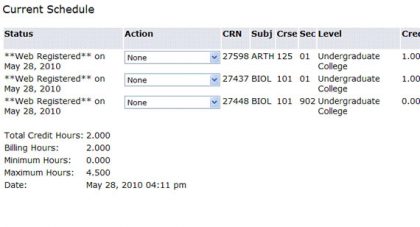
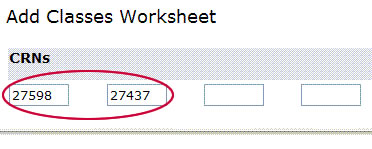 In this example, two CRNs have been entered
- The first CRN (27598) was successfully registered and you see it listed here in the Current Schedule section with “Web Registered” and the date in the Status column. The second CRN (27437) caused a Registration Error. You will see errors listed below the Current Schedule section under “Registration Errors.”
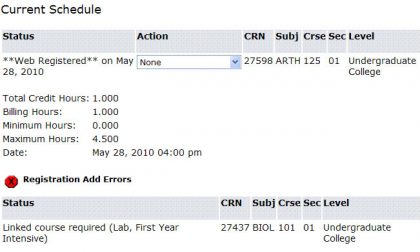
This error, a LINK ERROR, is caused by not registering for the required corresponding lab or discussion for a particular course. Go back to the Add/Drop classes section and enter the CRN for the course again along with the CRN for the required lab or discussion. For information on other errors, see the Common Errors section of these instructions 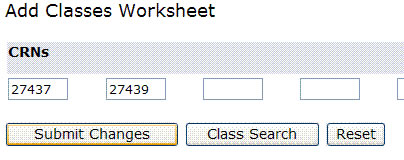 Use the Add Classes section of this screen to add other CRNs. Click Submit Changes to register.
- Continue to register until all of the classes you are interested in have been successfully registered and appear in the Current Schedule section. Remember to look at the Total Credit Hours section below the Current Schedule to keep track of the current amount of Credit Hours you have scheduled.
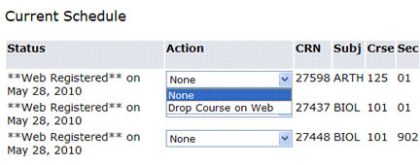 To drop classes, view your Current Schedule. Use the drop-down arrow in the Action field next to the class you want to remove from your schedule. Choose Drop Course on Web and then click Submit Changes. When your Current Schedule reappears, the course you dropped should no longer be there.
Common Errors
Classes for which you have NOT been successfully registered will appear under the Registration Errors section as seen in Add/Drop Classes. You must scroll to the right to view the Status column of that table to determine the reason for the error.
Some of the most common errors are listed here:
| STATUS MESSAGE | ACTION REQUIRED |
|---|---|
| Closed Section | Course capacity has been reached. Select another class. |
| Reserve Closed | Seats reserved for a select population of students. Select another class. |
| Linked Course Required | Course requires a lab and/or discussion. Check the course offerings for the required section and add the class again with the required lab/discussion CRN. |
| Prerequisite and Test Score Error | One or more prerequisites, corequisites, or placement level information are not in the database. Select another class. |
| Instructor Signature | Obtain instructor’s permission or select another class. |
| Time Conflict with CRN | Conflict in scheduling. Select another class. |
| Class Restriction | Enrollment based on class year (e.g., JR/SR only). Select another class. |
| College Restriction | Restricted to students enrolled in that particular college. Select another class. |
| Degree Restriction | Restricted to students pursuing that particular degree. Select another class. |
| Invalid Level for Course | Restricted to either undergraduate or graduate students only. Select another class. |
| Duplicate CRN | CRN has been entered twice. |
| CRN Does Not Exist | Incorrect CRN. Check course offerings to verify CRN and re-enter. |
| Maximum Hours Exceeded | You must drop a course first before adding another to your schedule. |
Perform a Class Search
It is recommended you search for classes using the Course Grids. However you may use this function to search the schedule to determine class availability and register for a class directly from the results window. Please be advised, courses that are full will not appear using this search function!
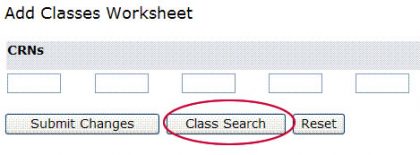 Below the Add Classes section, click the Class Search Button.
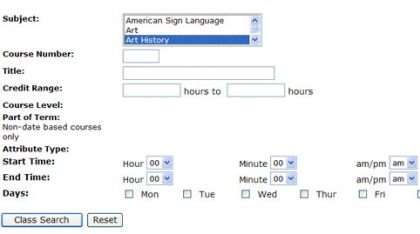 In the Class Search dialog box, enter the chosen parameters for your search. For example, you could search for all Art History classes that meet on M/W/F. Please note: you must select a subject; other criteria are optional. Click Class Search at the bottom of the dialog box when ready to search.
- In the results window you will see the classes available for registration.
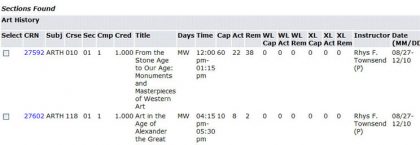
- The checkbox in the “Select” column indicates that you may register for the class.
- To register for a class, click the box to select the class, then click the Register button at the bottom of the table. Click Class Search to begin a new search.
Printing Your Schedule
When you have successfully registered for all of your classes and lab/discussion sections, you may print your schedule.
- On the Add/Drop Classes page, use the Student Schedule by Day and Time link at the bottom of the page to view your detailed schedule.
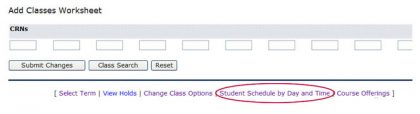
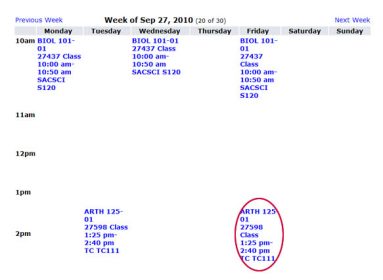
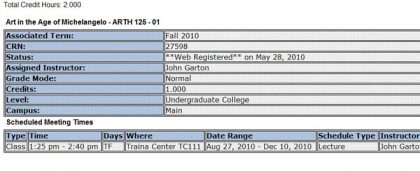
- Your courses will appear in a grid format. Follow the instructions on the screen to see next semester’s course schedule. Within the grid, click on course subject and number to view particular course details (see below).
- Then go to File > Print. It is also a good idea to do a Print Preview before printing. You may need to change the page orientation to “Landscape” (in the Print Dialog box).
Revising Your Schedule
To make changes to your schedule online after you have already registered, go to the Add/Drop Classes section. If you have already registered for your maximum number of units, you must drop a course before you can add another to your schedule. Make sure to click on Submit Changes to process. Check the Current Schedule section to be sure your changes were successfully processed. All class restrictions, enrollment cap, etc., are in effect during schedule revision.
Additional Instructions
- Graduate students will register for graduate level courses ONLY. These courses are 3 to 5 digits in length and begin with the number 3 or above. Students must be registered for a minimum of three units to be considered full-time.
- Individualized Courses Directed Study courses (A&S), Directed Research courses (SOM), and Independent Study courses (SPS) are created on an individual basis upon request.* Information will then be provided to the Registrar’s Office to create the course. You will receive an email from the Registrar’s Office containing the CRN number, which you will use to register online yourself for that course. *NOTE: A&S students: email the faculty; SOM & SPS students: email your Advisor or Program Chair
- Variable Credit
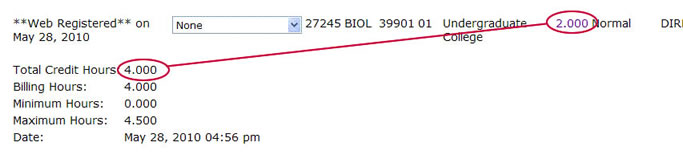
Courses that appear on the schedule with “Var” in the Units column are offered for variable credit (e.g., Directed Study courses are 1.000 to 3.000 units). A default unit (generally 1.000) will automatically appear in the credit hours field after you have registered for the course. If the default unit is incorrect, follow the directions below to change it. If you have questions about the number of units assigned to a variable credit course or are unsure of how many units to register for, please contact your department.- After you have registered for a Variable Credit course, the “default” credit will appear in the Credit Hours field. See the image below. If this is incorrect, click the Change Class Options link at the bottom of the page.
- The Change Course Options dialog box appears. The default Credit Hours appears in the Credit Hours box.
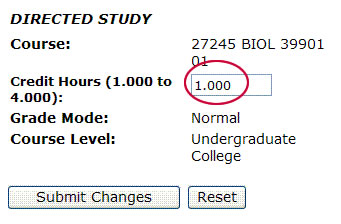
- To change the number of units, click in the Credit Hours box and enter the appropriate number of units. Click Submit Changes. After the screen refreshes, click Add/Drop Classes to return to the Add/Drop Classes page.
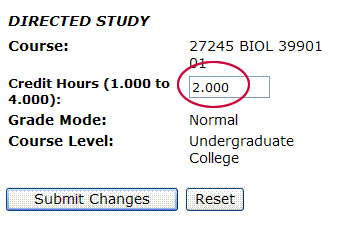 Confirm the correct number of units by viewing the Current Schedule section and the Total Credit Hours on the Add/Drop Classes page.